North Redwoods Book Arts Guild

If you are interested in more info or joining, please email to no.redwoods.bag@gmail.com

Sunday, December 26, 2021

SLIP KNOT BINDING WORKSHOP

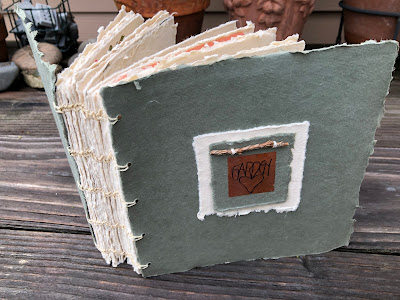
Our first workshop of 2022 will feature Carol DuBosch teaching a "Slip Knot" or "Larkshead" binding. This binding works best with heavy papers and book boards. It gives a rope-like look to the threads on the spine resembling a Coptic binding. It's important that we have our papers precut and tools and supplies ready when the class begins.


Supply List:

  • Six (6) pieces of HEAVY paper/chipboard, poster board, or cereal box cut to 2" x 3 1/2". The paper should be of a weight that you would hesitate to fold. Carol will demonstrate by using a collection of business cards.
  • Hole punch - 3 mm is best (this is slightly smaller than a normal 1/8" punch). If you have a Japanese Paper Drill choose a bit that is about 3 mm. If a normal hole punch is what you have, it will be OK.
  • Three (3) pieces of waxed linen thread cut to 16" each.
  • Ruler and pencil


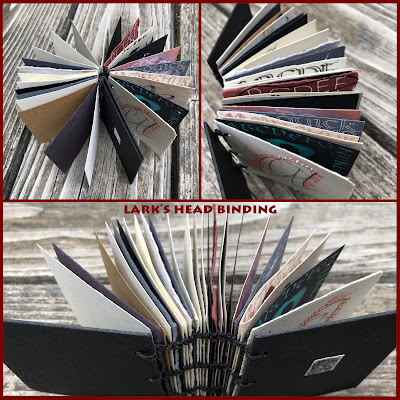
Here are photos of several more books with this binding.


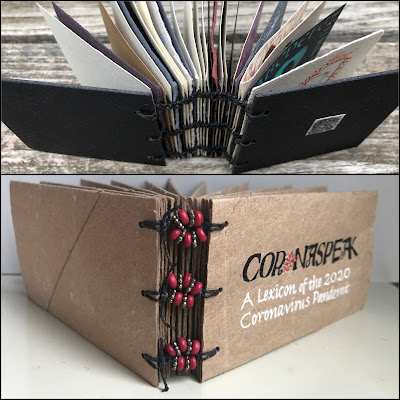
Beads can be added, but then the rope-like look of the binding
won't show as much.


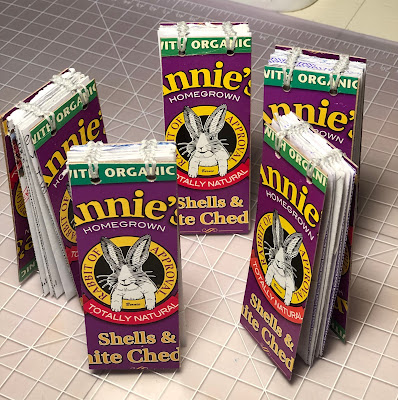
This photo shows how you can use cereal or mac and cheese
 boxes (for example) as covers or pages.

During the workshop Carol will show several books with this binding to further inspire us. For more information about Carol please visit her website:
https://www.caroldubosch.com/artwork/artist-books/

When:   Saturday, January 8, 2022 at 10 am PST
Where:  On your computer, tablet or smartphone via Zoom
RSVP:    Dolores Guffey by Monday, January 3 to receive the password
Workshop Questions:  Carol DuBosch
Zoom Questions:    Bobbie Hayes
Contact information for everyone is in the newsletter.

Thursday, December 16, 2021

HOLIDAY CARDS 2021

Here is a teaser preview of the NORBAG Holiday cards of 2021. For an up-close look of each card be sure to visit the Flickr Gallery (link is on the left). Although the local members could not get together in person again, those of us from out-of-town especially appreciated the great job by Dolores Guffey and Bobbie Hayes in putting together the Zoom event for all of us to enjoy.


It was another wonderful selection of cards that included pop-ups; a flip card; eco-dyed, marbled and cyanotype papers; a stitched card and origami folds. The creativity was awesome.

* 2022 * 

Our first workshop of the new year will take place Saturday January 8. Carol DuBosch will teach us how to make a Slip Knot or Larkshead binding. This is a binding that works very well to use with heavy papers that are unfolded single sheets. More information, including the supplies needed, will follow in the next blog article, but to whet your appetite here are a couple of photos of books bound with the slip knot. To learn more about Carol and her book art visit her website: https://www.caroldubosch.com/artwork/artist-books/


Saturday, November 27, 2021

HOLIDAY CARD EXCHANGE


 The Holiday season has arrived and it's time to celebrate another year of book making and sharing. While the local members will certainly miss the wonderful in-person get-togethers at Sandy V's house, now the out-of-towners can join in thanks to Zoom. We invite everyone to join Dolores Guffey at December's Zoom meeting as she presents the 2021 Holiday Exchange Cards. Many thanks to all who participated in this festive exchange. We hope that the members who made cards for the exchange will join us at the Zoom meeting to discuss their cards, and share with us various aspects of their inspiration, structure and design. Those unable to join us will have their colophons read as the card is shown on the screen. As time permits, after the sharing of the cards, we will have visiting time amongst us to exchange best wishes for the holidays and coming year.

When?   Saturday, December 11, 10 a.m. Pacific time

Where?  On your computer, tablet or smartphone via Zoom

RSVP:    To Dolores Guffey by Dec. 6 to receive the password

Zoom questions: To Bobbie Hayes 

Contact information for Dolores and Bobbie is in the newsletter.


Humboldt County Library kiosk display

Here are some examples of cards from past holiday exchanges.


Wednesday, November 17, 2021

DIAMOND X WORKSHOP

The Diamond X binding stitch is an eye-catcher, especially with the addition of a bead in the middle of each X. Becky Luening led us in a very informative workshop to create wonderful three section journals with a pleated spine that showcased this stitch. More than 40 members from across the U.S., Canada and the U.K. participated. Many thanks go to Becky for her detailed instructions and for showing many variations that can be used with this binding method. Thanks also go to our Tech Coordinator, Bobbie Hayes, for keeping the workshop running in an organized manner.

Becky Luening

Becky demonstrating the stitching pattern.


Here are some examples of journals that were made during the workshop.

Mary Conley's very lovely colorful book.


Edge Gerring used different colored accent beads.

Michele Kamprath

Michele used her beautiful eco-dyed paper for the cover.


Margaret Beech demonstrated the stitch without beads.


Bonnie Julien included the instructions in her book.

Emmy Nelson

Emmy's gorgeous wet cyanotype covers.


Saturday, October 30, 2021

DIAMOND X BINDING

Becky Luening, our member from Portland, OR, will teach us a 3-signature journal at our November workshop. This structure has a pleated spine with the "Diamond X" stitch described in Keith Smith's 1-2-&3-Section Sewings: Non-adhesive Binding Vol. II. Becky will present a few variations before leading participants in preparing their covers and signatures, and then executing the Diamond X binding. Please prepare your cover and signature papers in advance. 


Supplies:

For the cover, choose heavy paper (e.g., watercolor or printing paper) that can be folded easily but is somewhat stiff and sturdy. Something colored or decorative. Cut to 18" wide by 7-1/16" high, grain short. (Note: If your scraps aren't quite big enough, the width can be reduced by a few inches; 18" allows for a full turn-in.) Optional: Line your cover with decorative paper using adhesive and overlap 1/4" to create a decorative edge on outer cover, top and bottom.

For the three signatures of five sheets each, start with 16 sheets of 8-1/2" x 7" paper (i.e., 8-1/2" x 11" paper, trimmed down); the one extra sheet will be used to create the jig for the binding holes. Note: you can use fewer sheets or more sheets per signature, depending on how many pages you want in your journal. Just figure the same number for each signature. 

Tools & other materials (plus papers above):

  • pencil & eraser
  • ruler
  • sewing cradle, or alternate, such as a phonebook
  • awl
  • linen or embroidery thread (5 to 6 feet)
  • beeswax
  • scissors
  • tapestry needle (apporx. size 22 = big enough for your thread, but small enough to pass through your beads, if using)
  • 12 beads (optional; if using, make sure your needle and thread are able to pass through the bead hole twice!)
  • bone folder
  • X-acto knife or similar


When:    Saturday, November 13 at 10 a.m. Pacific time 
Where:   On your computer, tablet or smartphone via Zoom
RSVP:     To Dolores Guffey by Nov. 8 to receive the link, password
              & Becky's instructions 
Workshop questions: Becky Luening
Zoom questions: Bobbie Hayes
Contact information for everyone is in the newsletter   


Monday, October 18, 2021

REVOLVING BOX RECAP


Margaret Beech's revolving cubes workshop was great fun. More than 40 participants joined on Zoom. We each made two identical origami boxes and threaded straps around them to create a cube that would revolve in four directions and then move back to the original place. There were "squeals of delight" as everyone played with their new "toys". Margaret told us that this structure has no real purpose, but it sure is fun to play with. In a serendipitous way, it turns out that these boxes could have a purpose beyond being a sculptural plaything.

During the workshop, our technical coordinator Bobbie, had the brilliant idea to make two more boxes that could be inserted upside down into each of the open origami boxes. These boxes then serve as added reinforcement and give a more finished look when the boxes are revolving. Because one could also hide little things inside the boxes they now have a useful purpose. Margaret suggested that you make these new boxes 1/2" smaller than the originals. I tried making my new set of boxes just 1/4" smaller and they fit snuggly, but still can be easily removed. It might depend upon the type of paper you use so it's good to make a model first to see what size works best.

Thank you to Margaret for a very fun and unique workshop, and to Bobbie for her very clever addition.

Margaret Beech


Here are photos of some of the boxes made by our members.

Bobbie Hayes

Bobbie Hayes


Carol DuBosch

Carol DuBosch

Mary Elizabeth Nelson

Mary Elizabeth used her beautiful cyanotype paper.


Kathy Warren


Kathy Warren


Margaret Beech's example shows the addition of the
second set of boxes.

Second set of boxes shown on the right. They do not need
the added reinforcement we used on the original boxes.


If our local members have an opportunity to visit the Humboldt County Library in Eureka, they will find a new display of our artist books and cards. Here are some photos.


Thank you Kenzie for the display and Dolores for the photographs.


Sunday, September 26, 2021

REVOLVING CUBE

 Our October workshop will be a fun interactive structure taught by our member from York, England, Margaret Beech. We will make two identical origami boxes, which when laced together in an ingenious way make a Revolving Cube. Margaret promises that this is much easier than it sounds, but suggests that you watch a short video by NORBAG member Nancy Akerly demonstrating her "Rolling Cube"

youtu.be/yEEmcmEgQkE or tinyurl.com/vcjn2dr3 

Special thanks to Nancy for the original instructions.


For one cube you will make two identical size origami boxes, so please cut in advance:

  • Two 7" squares of decorative paper (good weight)
  • Two 2 1/2" squares of the same paper used for the box
  • Three 7" x 1/2" strips for the lacing, colored on both sides. Note: If your paper is lightweight then cut the strips 1" wide, fold in half lengthwise and glue together.
Also, cut the following pieces from light cardstock. Margaret recycles old greeting cards; these will be concealed inside the boxes. Please have them cut in advance.
  • Two 2 1/2" squares (these will reinforce the bottom of each box
  • Eight 2 1/2" x 1 1/4" pieces (these will reinforce the sides of the boxes

When:    Saturday, October 9 at 10 a.m. Pacific time
Where:   On your computer, tablet or smartphone via Zoom
RSVP:     YES by October 4 to Dolores Guffey to receive the link, password and Margaret's instructions
Workshop questions: Margaret Beech
Zoom questions: Bobbie Hayes
Contact information for Dolores, Margaret & Bobbie is in the newsletter