North Redwoods Book Arts Guild

If you are interested in more info or joining, please email to no.redwoods.bag@gmail.com

Showing posts with label Dianne Byington. Show all posts

Friday, January 17, 2020

JANUARY WORKSHOP REVIEW

Australian Reverse Piano Hinge Binding. Dianne Byington took all of those words and showed us how this deceptively simple book structure could be used in a multitude of ways. We brought nothing more than 4 rectangles of card stock folded in half and a 4 1/2 x 3" scrap of cardstock for hinge pins. The basic book was shown on the first page of the January newsletter.

To begin, Dianne handed out an instruction sheet that included detailed step-by-step instructions as well as a page with color photographs of the general steps to make the structure. Three of the cardstock pages would serve as signatures, the fourth would serve as a cover, and the small paper would serve as a hinge pin (which slips into a tab to hold the book together). Dianne supplied additional paper for the hinge (which acts as the spine and holds the signatures together). She had a table of samples using different materials, various configurations of the hinge itself, and varieties of hinge pins from paper to twigs.

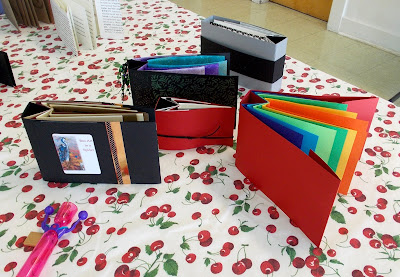
The table was filled with different samples. The fuschia sample used punches
on the exposed hinge paper to give interest. The tiny blue book is made from tyvek.
 (Note: you can tap on the photograph and it will open in another tab where you can see a larger image.)
This sample is a book of shoes. The hinge pins are extended and curled to create
fireworks. The tabs holding the binding together are shaped and exposed
 for additional drama on the outside of the structure.

On the left is "My Book of Hinge Pins" with a cover to hide the hinge
(see below for another view). The blue book shows the hinge that has used
a water like paper punch on both pins and hinge.

"My Book of Hinge Pins" has pockets inside the book. The nature of the hinge
 allows thicker items added to the pages without causing the book to fan open.

This book signatures are not cardstock but rather text weight paper.
Photos have been attached to the hinge tabs.
We gathered around Dianne's table and watched as she demonstrated the steps to make the structure. We picked up the instruction sheets and other materials and started on our own books.
Dianne showing how the hinge tabs are formed.


This is the instruction for scoring and folding the hinge strip.
Note that the measurements are not consistent. We are making a working sample
 showing different size hinge tabs.

This is the folded hinge strip. The first and last flap will be connected
to the covers. The three mountain folds are inserted into a slit
 in the signatures and the page slides all the way to the valley fold.
This hinge becomes an open ended tab that will accept a hinge pin
to stabilize the page and the structure.
The red is the signature and a slit has been cut in the valley fold.
The white is the hinge and the mountain fold of the hinge is inserted from
 the outside to the inside becoming a tab for the hinge pin.

In this photo, the hinge tab is already in position and,
instead of a piece of paper for a hinge pin,
we inserted a popsicle stick to fill the tab and stabilize the signature.

Materials can completely change the look of the structure.
Our member is using paper with a different design on each side of the page.

In this sample, the hinge pin is simply adhered to the outside of the signature.


Another option for a cover is to use the fourth signature as a cover.
The fold of that signature is at the fore edge and the open side is at the spine.
Sandwich the hinge flap between the cover and it disappears.

After we were done, Dianne gave us another hinge and small stick
that was somewhat irregular. She demonstrated how to use a piece of text weight paper
 to measure a tab for an irregular hinge pin.

Show and Tell Table

At each meeting, we have three extra tables. One is the "Show and Tell" table. If we are playing with a new technique, finished a piece not in the exchange and want to talk about it, displaying a preview of the next month's workshop or an announcement or article, we have a place to put it. We usually announce those things before the exchange takes place.
"Into the Fold" is a full page newspaper article about origami classes that three of our members are taking.

Another member is experimenting with collage on recycled children's books. (Tap on the photo to see the detail.)

This lovely accordion card of flowers with cut-outs is lovely. 

This is a really TINY miniature book. 
The second table is interesting. Whether you are close enough to attend our meetings or are one of our distant members, you probably do the same as we do, you share. Those things go on our "FreeBee" table. Take what you like. Bring something if you like.
Since our next meeting is a valentine workshop making cards for shut-ins,
 card blanks were available. Calendars, brochures, magazines, containers and much
 more all find their way to the table.


The last table is very different. We have received donations from members
that are simply more valuable. So we put them on the table and they are for sale.
No prices, no one to watch to see what you pay. Just the change box and the items.
You decide what it is worth you and you make your own change.
Sometimes we have books, book blanks, finished projects, specialty papers
or even a calligraphy set. They all find a home and
the guild treasury has a bit to offset postage and the other expenses we incur.

See you next month!

Tuesday, December 31, 2019

AUSTRALIAN REVERSE PIANO HINGE BINDING

Let's start off the first workshop of 2020 with this versatile binding taught by Dianne Byington. Apparently there are numerous variations and different names for this binding (Dianne found six). To add to our skills and techniques we will make an exposed-hinge cover, concealed-hinge cover, narrow and wide paper hinge pins, flat wooden hinge pin, insert and adhere an extra page for memorabilia or ephemera, AND make a hinge binding strip out of Canson Mi-Teints, Fabriano Tiziano, Tyvek, or 65+ lb cardstock.


Basic book with hinge & pin variations.


Flamboyant variations are within the realm of possibility.


Materials to bring:

  • Double-sided tape, any size from 1/4" to 1" wide
  • 4 pieces of cardstock for pages, any colors: 4 1/4" (or taller) x 11" folded in half to size 4 1/4" (or taller) x 5 1/2"
  • 1 piece of cardstock for hinge pins, any color: 4 1/4" (or taller) x 3"

Tools to bring:


  • Awl or push pin or paper piercing tool
  • Craft knife or Xacto
  • Cutting mat
  • Bone folder
  • Pencil and eraser
  • Magazine for piercing cradle (optional)
  • Ruler (optional)

Dianne will provide:
Some hinge binding strips and hinge pins and instructions. 


When:    Saturday, Jan. 11 at noon
Where:   Eureka Methodist Church at Del Norte & F Streets
Bring:     See list above
Cost:      $1
RSVP:     To Dianne by Jan. 7. Contact information in the newsletter

Monday, May 20, 2019

FISHBONE AND TREE FOLD WORKSHOP

On Saturday, May 11, Dianne Byington led us in a workshop using two of Hedi Kyle's structures, the fishbone and tree folds. When telescoped together, the fishbone structure has panels of the same width. The tree fold results in panels of different sizes. Dianne had several tips and tricks for us to use, as well as different versions of the folds. She also showed us different kinds of covers.


Dianne showing us the cutting pattern

One of the things that Dianne spoke about was the terminology used for making these structures. So we adapted to new terminology. Dianne also made mention of the different marking and scoring methods. Here you see different types of rulers being used, as well as someone using a scoring board.


After marking, we scored the pages.

After scoring, we marked the areas to be left uncut. We cut some parts
 and left others attached which allowed the folds/pleats to open. 
The paper was folded along the cuts and the uncut areas.

This picture better illustrates how the pleats open. On the uncut
section, we used double stick tape to hold the last uncut section.

We telescoped the pleats to achieve the fishbone structure.

This is a model of Dianne's tree fold. You can see that the open
 areas are larger as you go, resulting in a very tree-like structure.

We made both structures during the workshop using papers that Dianne brought. She also brought four samples of covers for us to use. 


Dianne brought many samples of these two structures and how we could use them.


The uncut section size will affect the overall look of a fishbone book. On the left, the uncut sections are one-half inch. On the right, the uncut sections are one-quarter between each resulting in a more compack structure.

Soft folds look more like organic structures. To achieve this look, 
when a crease occurs, it isn't set with a bone folder.

Tyvek that has been painted makes a lovely tree fold.

This is a fish fold in a simple cover shown both closed and open.

This was a fun workshop and it will be interesting to see how it appears in our future exchanges. 

Please note: many of our members went to the Newport Paper and Book Art Festival last month and we have pictures of their efforts in the previous post. 


Thursday, May 2, 2019

FISHBONE AND TREE FOLDS

Hedi Kyle's book, The Art of the Fold, (available in the NORBAG Lending Library) provides a wealth of information and examples of some wonderful book structures. The May NORBAG workshop will feature two of those folds, the fishbone and the tree. Dianne Byington will instruct us on the difference between them and how to make them along with some variations. Some basic skills to be covered are paper folding, mountain fold, valley fold, and because of the many folds, we will review how to determine grain direction of papers to prevent cracked folds.


Tree fold, with varying page lengths

Tools and Materials to Bring:
  • Self-healing cutting mat
  • Scissors
  • Craft knife or X-acto knife
  • Bone folder
  • Pencil & eraser
  • Scoring tool - paper will be scored multiple times so bring your favorite scoring tool: clear gridded ruler, measuring rules, ruler, or scoring board
  • Embossing stylus or pointed bone folder
  • Double-sided tape, 1/4" wide suggested

Materials Provided:

  • Paper, decorative on one side, white on the other 


Fishbone fold, with sharp folds

Fishbone fold, with soft folds

WHEN:    Saturday, May 11 at noon
WHERE:  Eureka Methodist Church at Del Norte and F Streets
BRING?   See list above
COST:     50 cents
RSVP:     YES! by Wednesday May 8 to Dianne Byington, contact information will be in the newsletter.


Wednesday, January 23, 2019

THE SPIDER BOOK WORKSHOP


 On Saturday, January 12, 2019 we had a delightful workshop given by Dianne Byington. She presented a Hedi Kyle structure from the book, The Art of the Fold. It is a "spider" book. The name is from the fact that when the structure is standing on the fore edge, it looks suspiciously like a spider with the triangular spine as a head and the folded pages looking like segmented legs. Dianne had a sample made in black that had two of the tiniest black, shiny beads attached to the outer portion of the spine looking just like a spider.


Just love this sweet little "spider"
Lynne G, our newsletter editor, saw the pictures and brought another sample that was filled with spiders. Needless to say, we were really ready to play with the Hedi Kyle structure.

The book is sewn together with a pamphlet stitch and Lynne attached a spider to the thread.
 Don't get the wrong idea. This was not a Halloween workshop! Dianne gave us a very clear idea of what this could look like and it was not dark and dreary. Instead, the structure calls for color. Just look at the other samples that Dianne brought.


Take a close look at these books (click on the picture and it gets bigger). Dianne's samples also have different types of fore edge closures. From a simple cut edge, a folded edge and even (the grey one) a box-like closure.
Dianne started the day.

We started with a rectangle of paper, folded it in half and each of those in half again. This is the core of the spine. We will eventually have the two ends overlapping and glued together after the pages have been sewn onto it.

Applying tape to the edge that will overlap

We folded all of the interior pages in half


Once all of the pages are folded in the center, on successive pages, a second fold will be made to the left and right of the center fold at increasing distances. 


Each successive page has a deeper fold. The spine will eventually nestle into the deepest V.
Because of the multiple folds on each page, the usual punching cradle doesn't work as well as a simple telephone book. With the smallest fold on the bottom and ending with the opened spine (the order you use to sew the pamphlet stitch), we used a jig to make the stitching holes.

We sew the pamphlet stitch from inside of the spine to the center of the pages. When that is complete, the double-sided tape is exposed on the spine and the two flaps are put together.  Then on to the covers.


Last, but not least is the addition of a cover. The cover comes in two parts. Each part has a section that is the width of the spine base. The back cover is applied first so that the smaller folded portion covers the spine. Then you apply the front cover with the flap covering the back flap.

Dianne gave us several techniques about doing things with these books. She also suggested three different fore edge closures. The most simple cut it off, a folded back edge to give more strength and this one where the fore edge is folded the width of the spine. You can see it in the closed position in the first pictures. Many thanks to Dianne.

ON TO THE FINISHED BOOKS!