North Redwoods Book Arts Guild

If you are interested in more info or joining, please email to no.redwoods.bag@gmail.com

Tuesday, July 31, 2018

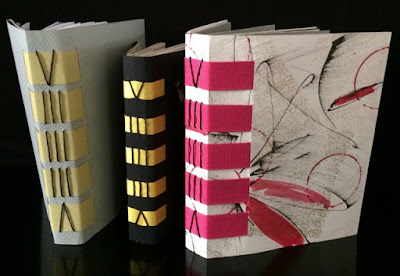
KEITH SMITH BINDING OVER RIBBON WORKSHOP

The August workshop will be taught by Donna Gephart. This binding is from Keith Smith's book 1, 2, & 3 Section Sewings, but will use ribbons rather than the leather or vellum he suggested. Donna said it is a striking binding when the ribbons and thread are carefully chosen. This workshop will provide an easy introduction into learning how to read Keith Smith's stitching instructions!


MATERIALS TO BRING:

  • Cover Paper: 18 1/4" long by 5 5/8" high, cut grain short (grain running parallel to the 5 5/8" side), Mi Teintes or similar weight paper.
  • Three Signatures: papers 8 1/2" long by 5 1/2" tall, folded in half to create signatures 4 1/4" wide by 5 1/2" tall. Use enough paper to fill a 3/4" wide spine.
  • Ribbon: Five pieces of ribbon 5/8" wide, cut to 4" lengths. Grosgrain ribbon is best. Don't use anything too slippery, so stay away from satin. Also, a solid color ribbon is suggested so that the stitching will be showcased.

TOOLS TO BRING:


  • Metal measures/spacers if you have them
  • Ruler
  • Bone folder
  • Piercing awl
  • Piece of foam core, cardboard or phone book for flat piercing
  • Exacto knife or similar tool
  • Cutting mat
  • Piercing cradle or phone book for section piercing (cradles will be available to borrow)
  • Pencil
  • Glue stick and double sided tape
  • Plastic covered large sized paper clip, or binder clip for holding sections
  • Waxed linen or similar thread such as Perle Cotton #5, for sewing in contrast to the ribbon
  • Sewing needle appropriate size for your thread

When:   Saturday August 11 at noon

Where:  Eureka Methodist Church at Del Norte & F Streets
Bring:    See above list
Cost:     $1.00
RSVP:    YES, by August 6 to Donna (contact information in the newsletter)

Tuesday, July 24, 2018

Pivot Panel Workshop

In July, 2018, Dolores Guffey led a workshop of a Hedi Kyle structure called the pivoting panel. It was a two part workshop. The first part was to construct the structure. The second part was to give us an additional handout and discuss how to make our own version that includes determining measurements, different openings and types of covers.

Dolores started the workshop with a very long pivot panel book
 to show us how many different things we could put on the panels.

Dolores works hard at bringing a good workshop to us. 
She made sure that she had samples of each step of the structure.

We started with a simple accordion fold leaving a small tab
 at each end for affixing to the cover.


Ready for the next step.

Dolores gave us a jig for how we would cut each panel. After cutting out the jig,
 we compared our artwork to the jig for size. We could use artwork as a rectangle
 or cut it out using the entire jig area. This one uses only the rectangle.


We traced the jig shape onto our accordion fold card. 
This showed us exactly where to place the artwork.


Looking closely, you can see where the jig has been outlined on the sheet 
and then artwork is glued to the sheet. (As usual, these were glued on
 using the adhesive of your choice: glue stick, liquid glue or double sided tape.)


Once the gluing was complete, we started cutting. (Note that this artwork covered all of the jig area, not just a rectangle. This can appear that the artwork flows onto the background.)


One great tip that we learned was to glue the artwork, then cut on the edge of the artwork rather than the drawn line. This method insures that the cut is always at the edge of the artwork. In using the jig this way, you always have the artwork centered and the cutting is determined by the artwork. (Note: the drawing on the left shows how you cut around the artwork leaving a triangle that acts as the pivot.


After the cutting, we then worked the panels so that they would open and close easily.

These drawings were made by one of our members
 and she put them on both sides of the panels.


The last step is to affix the accordion to the cover. In this case,
 the tab was enclosed (sandwiched) between the folded cover.


Now for the finished books!

This is one of Dolores' samples. These are origami folded kimonos. 
With the right weight of paper for the structure, even three dimensional
 objects can be part of this book.


I wish you could have been here to see these. We had our own artists drawing things, photographs of a new litter of kittens, glittery red lipstick, magazine cut outs. Every color imaginable was used on the structures. And, just like Becky, we were all smiling.


The cats on the upper left are photos of murals found around town

Puppies!

Not a party, but wildlife none the less.
 (Notice that the panels can face to the front cover of the book.)


The artist chose to face these panels toward the back.

Here, the panels are displayed toward the center.

Hand drawn figures on both sides.


This one has a delightful sense of humor and glitter!


The last tip we received was about covers. This structure is intended for displaying open and with the tail (bottom edge) resting flat on the table. If the bottom of the panels and the cover are not flush, the book will always lean forward and not display the panels correctly or be stable.
  
Our workshops always seem to show our sense of fun, color, sophistication... whatever we bring that day. Thanks Dolores.


Friday, July 20, 2018

SUMMER LIBRARY KIOSK DISPLAY

The Humboldt County Library is celebrating summer with special activities for children of all ages and families. Our Guild is happy to participate by displaying some of our creative and colorful books, all made by Guild members. Art forms include dinosaur and galactic tunnel books, a miniature pop-ups book in a matchbox, a funny flip picture book, paper spheres, concertina fold books, die cut and hand cut shapes, wearable jewelry, a Miura folded pirate map, and more fun paper structures. Be sure to stop by the library for a closer look if you're in Eureka. Happy Summer!


Sunday, July 15, 2018

BAINBRIDGE ISLAND MUSEUM OF ART EXHIBIT

Beautiful examples of book art are always on display in the Sherry Grover gallery upstairs at the Bainbridge Island Museum of Art (BIMA). Cynthia Sears, the curator of these exhibits, is the founder of BIMA and an avid collector of artist books. According to an article by Monica Wooten, "Sears believes this art form often takes on highly serious subjects and promotes conversations about interesting and sometimes difficult topics. 'Hand-made books allow you to explore at your own pace as you turn the pages and ponder what is being said and how the artist is expressing it...before having to put into words your feelings and thoughts.' Sears sees these books, unique and awesomely artistic, as catalysts for uncovering important feelings and thoughts and then leading to needed conversation." 

The following photographs are of books featured in the Chapter 13 Lyricism and Laughter exhibit that closed in June. 

The Chicken or the Egg by Deborah Peek

Deep in the Willow Woods

Two Books by Shane Miller

Emily Dickenson XXXVIII by Sam Garriott Antonacci

Altered State One by Elsi Vassdal Ellis

Some Things Fishy by Carolyn Terry

Drawing the Crow by NORBAG member Kathy Dickerson.

Ever and Ever: Telling Time by Grimm's by Barbara Berger

Cancelling Out by JoAnna Poehlmann


Tuesday, July 3, 2018

PIVOTING PANEL BOOK

At the July workshop Dolores Guffey will teach us a Hedi Kyle structure with four pivoting panels. A great feature of this structure is that artwork can be shown on both the front and back of the panels since they pivot, or just on the fronts if so desired. The overall structure is 16" x 6" when fully extended, and 3 1/2" x 6" when closed.


Four Pivoting Panels


Materials to bring:

  • 1 piece Mi-Teintes, Fabriano, or paper of similar weight, 17" x 6" grain short (grain running the same direction as the 6" side)
  • 2 pieces Mi-Teintes, Fabriano, or paper of similar weight, 7" x 6" grain short (these will be the covers for the book). Please have these papers cut ahead of time.

Artwork for your panels:


  • Four rectangles 2 1/2" width x 3 1/8" high, to fit on panels, but won't cover the upper and lower pointed areas; OR four rectangles 2 1/2" wide x 4 1/4" high, which will be trimmed to cover the entire pivoting panel. Optionally, if you want to cover both sides of the panels, bring eight pieces of art in one of the two measurements you choose from above. Members who RSVP will be emailed diagrams which will show different examples of sizes and shapes for what will go on the panels.
  • Artwork suggestions: your own artwork, magazine illustrations, decorative papers, rubber stamped images, collage, calligraphy. The back side of the panels can be either artwork, text describing the front art, or left blank.

Tools to bring:


  • Craft knife with new blade (x-Acto, or similar cutting knife)
  • Cutting mat
  • Metal ruler
  • Pencil and eraser
  • Bone folder
  • Glue stick & scrap paper to work on

When:
   Saturday, July 14, at noon

Where:  Eureka Methodist Church, Del Norte & F Streets
Bring:    See above list
Cost:     50 cents for instructions and templates
RSVP:    YES, by July 9 to Dolores, her contact information is in the newsletter