North Redwoods Book Arts Guild

If you are interested in more info or joining, please email to no.redwoods.bag@gmail.com

Showing posts with label Michele Kamprath. Show all posts

Monday, June 27, 2022

LONG STITCH VARIATION JOURNAL

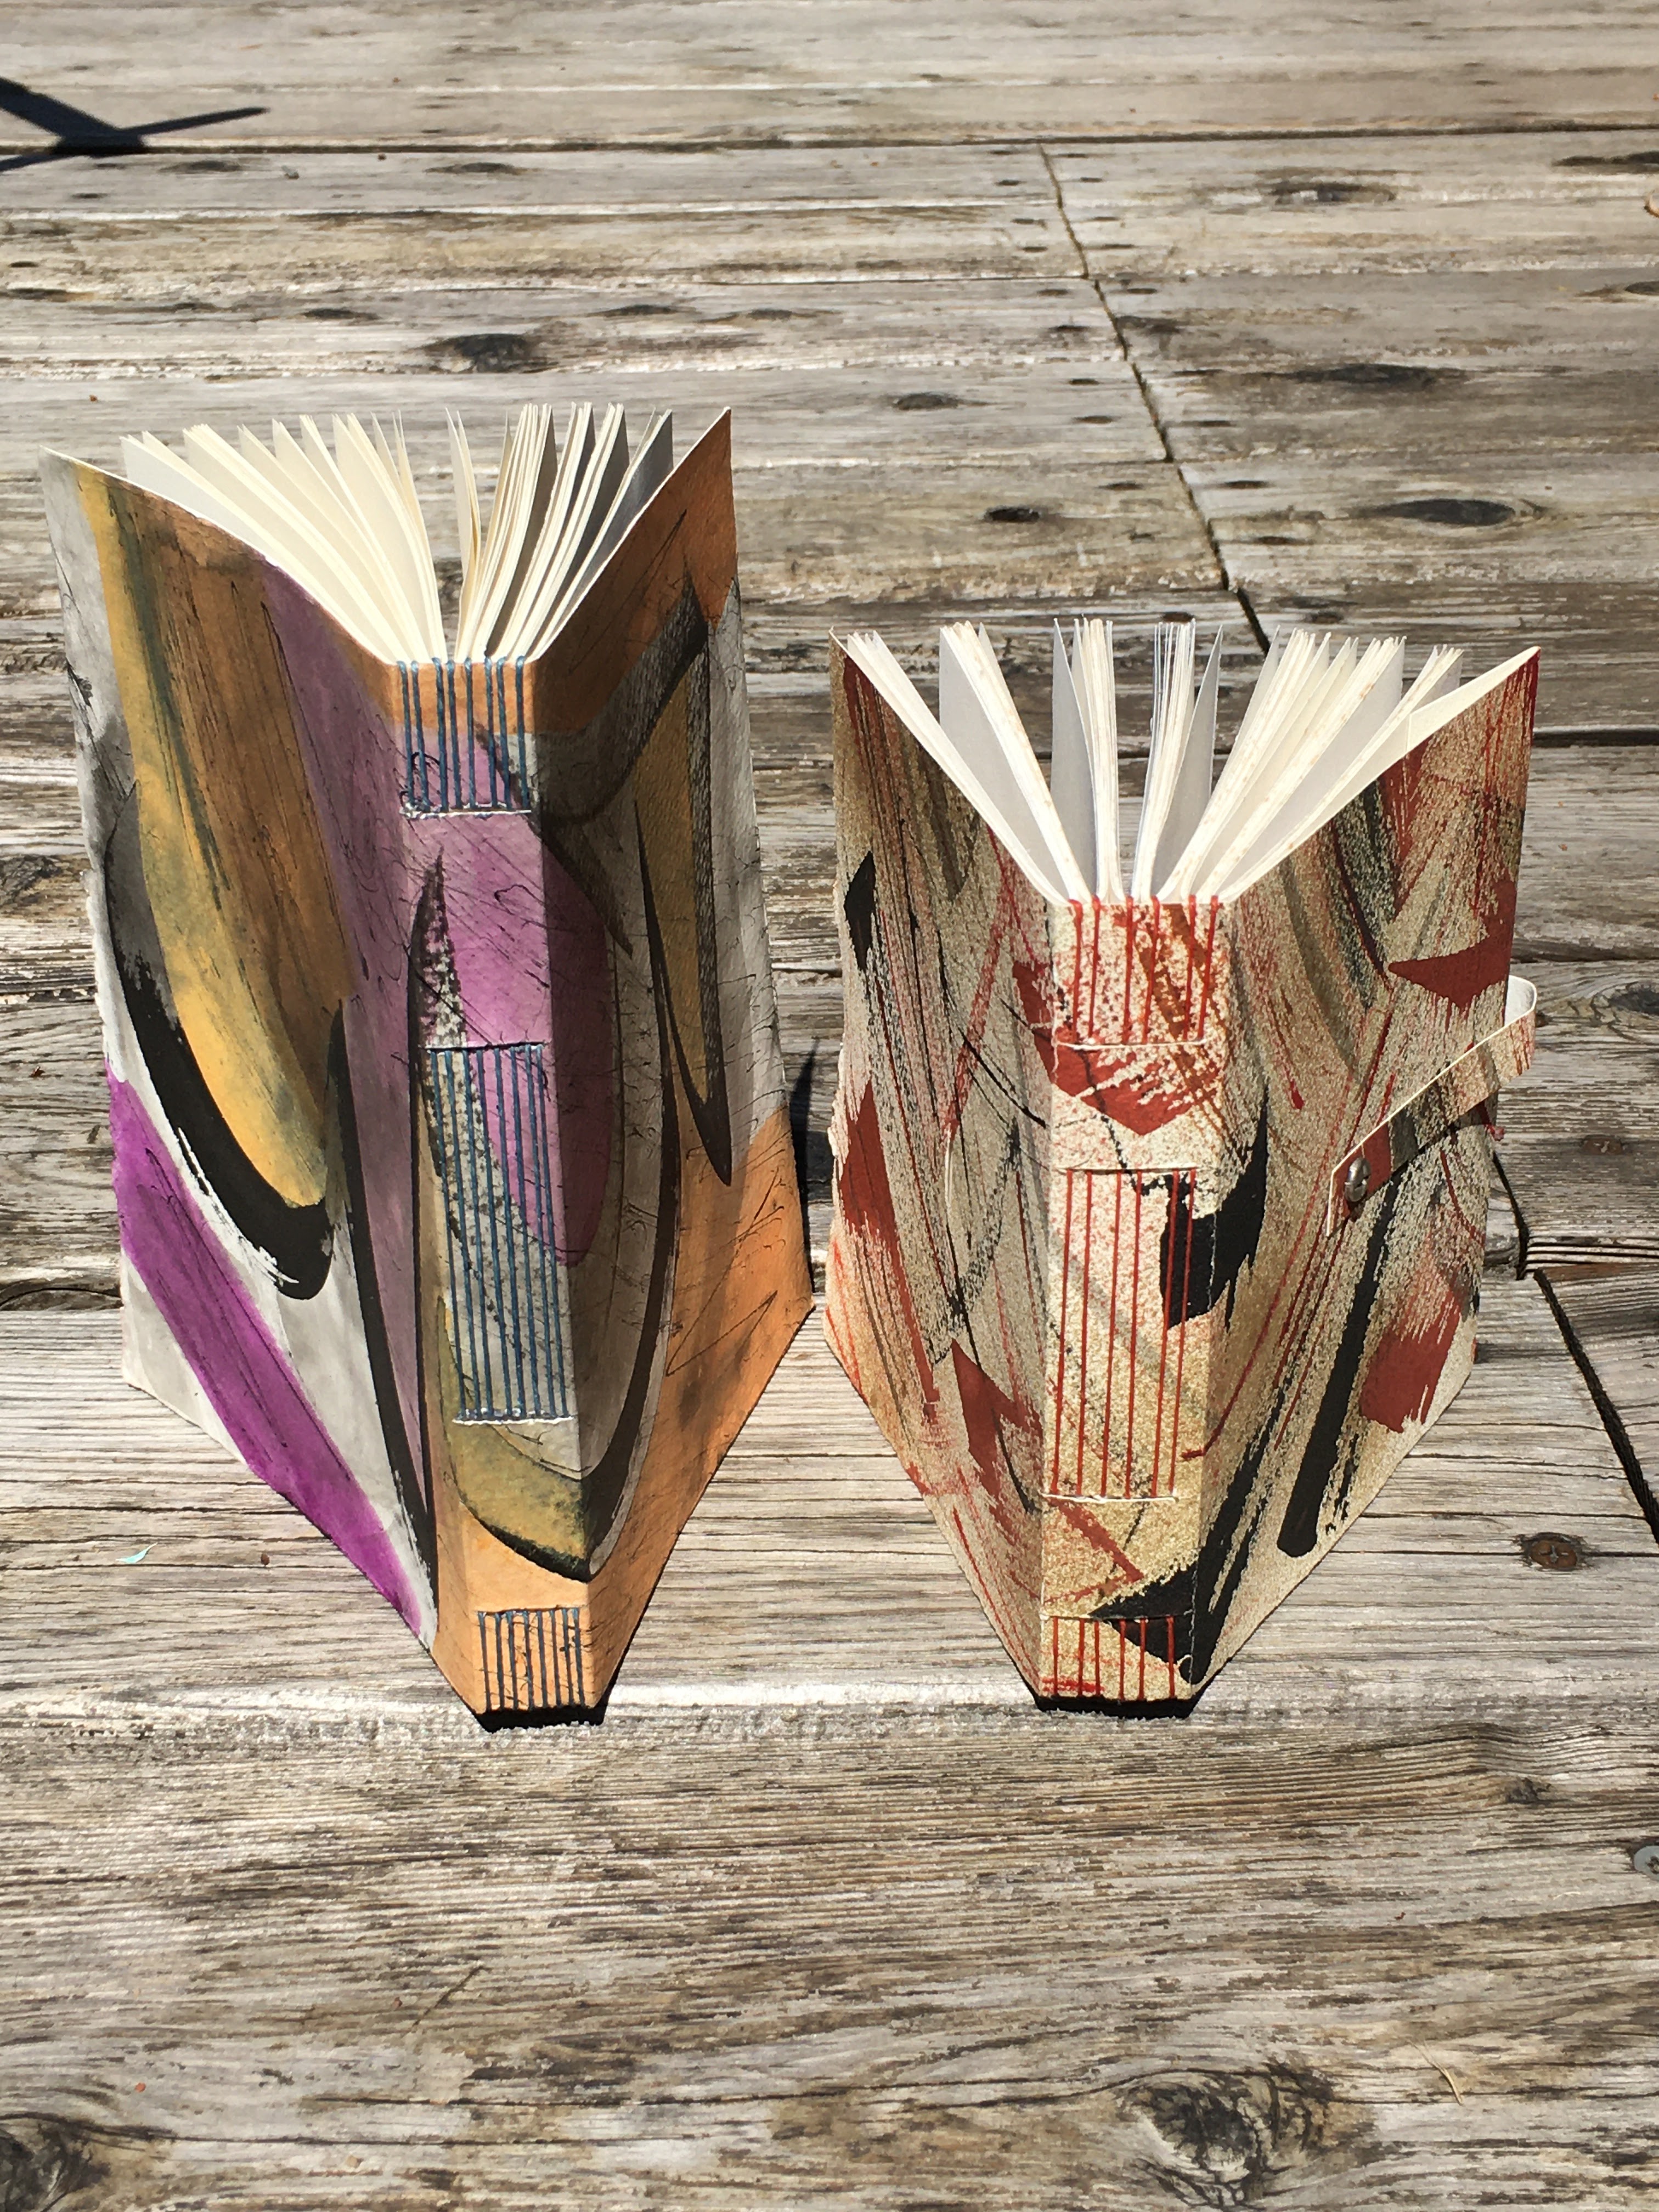
If you've ever tried to follow Keith Smith's directions for sewing structures, but found them confusing, you're in luck because Michele Kamprath is coming to our rescue. She will show us a variation of the long stitch journal described in Keith Smith's Non-Adhesive Binding Vol. 1. This is a great journal to use or to give as a gift. The journal size Michele will teach is 7 1/2" tall. If you prefer to make a shorter version either 5 1/2" or 6" tall, you will be able to adapt your journal sewing pattern to match the size difference during our workshop.

These two journals feature Michele's
 beautiful eco prints on the covers.

These journals show different sizes 
and painted covers.


For the cover:

Use a heavy weight paper like a 140 lb. watercolor paper if possible. It needs to be a paper that is sturdy but still able to fold. Decorated or colored paper will be best. Maybe you have an old painting lying around or want to get out your brushes and play? The cover should be 7 1/2" tall x 13 1/2" wide (grain short if possible). This will allow for a pocket turn-in on the cover. If you do not want a pocket turn-in, your paper would be 11 1/4" wide.

For the signatures:

We will be sewing eight signatures into our cover. Using text weight paper, you will need about 48 pieces (six per signature) that would fit into a 3/4" spine area. If your paper is heavier, you will need less than 48 sheets. Signature paper size: 7 1/2" tall x 10 1/4" wide grain short if possible.

Note: Please cut cover and signatures ahead of the workshop time. Please weight your signatures overnight if possible so they will fit neatly into your spine area.


Tools Needed:

  • Pencil and eraser
  • Ruler
  • Piercing cradle or phonebook
  • Awl
  • Waxed linen or embroidery thread to match cover
  • Beeswax if needed for unwaxed thread
  • Needle (wide-eyed like a tapestry needle)
  • Bone folder
  • X-acto or other cutter
  • A piece of paper for your sewing jig: 7 1/2" tall x 3" wide
  • optional tools: small needle-nosed pliers and tweezers

When:
   Saturday, July 9 at 10 a.m. PDT
Where:  On your computer, tablet or smartphone via Zoom
RSVP:    Dolores Guffey by July 4 to receive the password
Workshop questions:  Michele Kamprath
Zoom questions:   Bobbie Hayes
Contact information is in your directory or the newsletter


Tuesday, January 12, 2021

JANUARY 2021 WORKSHOP NOTES

NORBAG's January Zoom workshop had our largest attendance to date - 52 members joined us for Michele Kamprath's excellent presentation of making a Star Book. This was our first workshop at the new time of 10 a.m. PST. We had our papers pre-cut and essential materials at hand so Michele was able to lead us through step-by-step on constructing the book. At the end of the workshop members shared what they made and the creativity of our group certainly came through in the different color schemes and variations that were made. Thank you Michele for a workshop that will inspire us to make this book again and to try out some of the alternative ideas that our members shared. This workshop was recorded and is now available for viewing. To receive the link and password contact Dolores. This recording will be deleted on February 13, 2021 at midnight.

Photo Gallery

Some of the books featured here are still in the process of being completed.

Edge Gerring

Edge
The cut-outs and pop-outs beautifully showcase the other layers.

Molly Millman's book is so cheerful.

DJ Gaskin

DJ's papers add a whimsical touch.

Dolores Guffey used a starburst punch to create
a design on some pages.

Mary Elizabeth Nelson used a circle punch to showcase
her beautiful cyanotype papers.

The French Link stitch was used
to bind Mary Elizabeth's book.


Margaret Beech added pop-out and collage elements.

"Busy" hands are featured in Margaret's book.

Stephanie Weigel added stitching to the edges on her book.

Vibrant paper colors enhance Stephanie's book.

Sherrill Story

Sherrill's book had different cut-outs
to show off inside layers.

Donna Gephart
The final layers are not yet attached. This is a memory book
to celebrate her daughter's European trip in 2019.

Some pages are blank for photographs and some 
have pockets for ephemera.

Jill McInerney

Beautiful blue & green colors enhance the star.

Thursday, December 24, 2020

STAR BOOK WORKSHOP

 We will kick-off the new year with a Star Book structure taught by Michele Kamprath. 


This is a fun little book to make but a bit involved, so Michele asks us to please do some prep a day or so before the workshop so that we will have time to finish our books.

PLEASE (1) cut your papers; (2) cover your coverboards with decorative paper; and (3) weight your covered boards overnight. You might also want to label the different cut papers so that you will know which layer is which. The finished book size is 3 1/2" high x 5 1/2" wide. If you decide to make cards for your pockets, the cards will be about 3 1/4" wide by just short of 3 1/2" tall.


Materials:

For the layers: cut cardstock to the following dimensions, grain short. Cardstock color can vary or be the same. Layer 4 is the main layer in the front so you might want to use printed cardstock for it. You can also showcase artwork, collage, photos, etc., on the Layer 4 papers and/or in the pocket enclosures.

Layer 1: 7 pieces 3 1/2" x 11"

Layer 2: 7 pieces 3" x 7" (YES, 3", not a typo)

Layer 3: 7 pieces 3 1/2" x 8"

Layer 4: 7 pieces 3 1/2" x 7" (This is the front layer that you look at when opening the book).

NOTE: If you want pockets in layer 4, the paper size would be 7" x 7". You can have some or all of your Layer 4 pages with pockets, or some with pockets, and some without.

For the covers:

2 coverboards - 3 1/2" x 5 1/2" (use matt board or book board)

2 decorative papers to cover the boards: 5 1/2" x 7 1/2"

Tools:

  • Piercing cradle or old phone book
  • Cutting mat
  • Sharp knife with extra blades
  • Steel ruler
  • Scissors
  • Bone folder
  • 1/4" - 1/2" double stick tape (both sizes if you have them), red tape is best
  • Several paper clips
  • Pencil
  • Awl
  • Sewing jig paper 3 1/2" x 3"
  • 2 pieces of ribbon for the ties, 10-12" each
  • PVA & glue brush; or other glue, glue stick
  • Needle and waxed linen thread if you have it or crewel embroidery thread and beeswax
  • Optional: pictures, artwork, patterned cardstock for layers, collage, or cards to go into the pockets 
Another example of how to "decorate" your fourth layer

Fourth layer pockets


When?
    Saturday Jan. 9 NEW MEETING TIME 
at 10 a.m. PST
Where?   On your computer, tablet or smartphone via Zoom
RSVP?     YES, by Jan. 4 to Dolores Guffey to receive the link and password and workshop instructions
Workshop Questions: Michele Kamprath
Zoom Questions: Bobbie Hayes
(Contact information for these members is in the newsletter)
 

Tuesday, July 28, 2020

HINTS, TIPS, & TOOLS


The August Zoom workshop will feature Dolores Guffey sharing her book art Hints, Tips, and Tools. Having been one of the original NORBAG members (25 years ago this September), Dolores has amassed a wealth of great ideas learned from fellow book artists, her own discoveries, and from the many conferences she has attended. This “workshop” will be a time for sharing ideas. She invites those of you who join the Zoom meeting to bring your own tips and favorite tools to share with us. We all learn from one another and there is always something new to discover.

When:   Saturday, August 8 at noon, Pacific time
Where:  On your computer, tablet, or smartphone via Zoom
RSVP:   YES, to Dolores Guffey by August 5 to receive the password. Her contact information is in the newsletter.
What to have on hand:  Paper to take notes and your own tips & tools to share.

Projects from our members


Michele's Keith Smith books


Those of you who received the June NORBAG newsletter saw the information about how to purchase unbound copies of some of Keith Smith’s books to bind yourself. Our member, Michele Kamprath, did just that and shared with us this photo of her books. Like the examples Dolores Guffey shared in the newsletter, binding these books with a Coptic stitch or sewing over tapes is a perfect way to have them bound so that they will open flat…very helpful when trying to follow Keith’s instructions.


Bonnie's "books-in-sheets" classics


Did you know that it is also possible to find unbound copies of classic books? On the Volcano Arts website you can find “Books-in-Sheets” that are ready to bind with your favorite materials. According to the website, the books “have been formatted in content-appropriate fonts. They’re imposed into separate sections and copied onto good quality 70 lb. paper. You just fold and sew.” Some of the books that are available include A Christmas Carol, The Secret Garden, 20,000 Leagues Under the Sea, and several favorites by Jane Austen. Bonnie Julien has bound several of these books with plans to give one to each of her grandchildren. Here is a link to Volcano Arts: 
https://volcanoarts.com/?s=books+in+sheets&post_type=product


Randi's Eco-dyed print


This print and the one above are available on Etsy

What else can you do with your beautiful eco-dyed or other surface designed papers besides make cards and books? Frame them! Our member, Randi Parkhurst, has refined her eco-dyeing techniques into an art form worthy of framing. Here are some photos of her work currently for sale on Etsy. https://www.etsy.com/shop/EcoPrintLove

Thank you to our members for sharing information about your projects. We're happy to pass along your photos and ideas.


Saturday, June 6, 2020

MORE PROJECTS AND ZOOM


As we begin the fourth month of dealing with the Coronavirus pandemic most of us are slowly moving into a more open environment. Who knows what the new normal will actually turn out to be, but for now it's refreshing to hear that many of us have been coping with isolation by making some beautiful book art and sharing it on various platforms. One can see wonderful examples on Facebook, Instagram, and Pinterest. Zoom meetings and other online classes are also becoming more popular since we haven't been able to meet in person. We hope you will continue to share your projects with us as we all strive to move forward and remain healthy.

NORBAG will hold its first Zoom meeting on Saturday June 13. This meeting will not have a workshop but rather a chance for our members to get comfortable with Zoom and meet and greet other members. It will be hosted by Celeste Chalasani and she will do a PowerPoint presentation of photos our members send to her. These photos could include books they've made for the exchanges (yet to be exchanged) as well as any projects they've been working on. In other words, your basic "show & tell". Please refer to page 1 of the June Newsletter for information and tips for using Zoom. 

WHAT:  NORBAG Zoom Meeting
WHEN:  June 13, 2020 at 12:00 pm Pacific Time (US and Canada)
RSVP:   YES, to Dolores by June 10 to receive information on how to join the Zoom meeting, along with the password. For the PowerPoint presentation, please send photos in JPG format to Celeste by June 10. Contact information for both Dolores and Celeste is in the newsletter.


Here are some examples of how our members have been using their "free" time.
  

This photo is a collection of books Bonnie Julien made in Helen Hiebert’s Flexible Book Structures 2 online class. The six week course included the following projects: Momigami & stained Tyvek, Expandable File Folder, Book Light, Pocket Book, Envelope Photo Album, and Scroll-a-Notebook. For more information about Helen’s classes here is a link: https://helenhiebertstudio.com/shop/product-category/class/
Michele Kamprath has been busy making some lovely books using monoprints. She watched Sally Hirst's Monotype Mayhem classes and came up with some wonderful prints.

Secret Belgian binding

This Secret Belgian binding book was a birthday gift to Michele's son.

Monoprints galore

This book features many of the monoprints.


Margaret Beech has sent another one of her fun book structures. She called this structure a crazy fold, but if you have a copy of the NORBAG compendium, vol.3 pg.20 you’ll find it listed as the "Whirligig" book.

This book was made several years ago by Dolores Guffey for a book exchange.


The "whirligig" part way opened

Here is what Margaret shared. "This time I am sharing my Crazy Fold with you. This is very easy BUT requires maximum concentration when measuring up. It's fun to make and it's up to you how you decorate the pages. In the illustration I simply used papers cut from old books but you could use decorated papers, music paper, write some quotations or verses of a poem or even old map pages. The fun really lies in the unraveling and the way the book folds up again. You will need to keep it under control so might need to make an envelope to hold your fold."

Margaret also said that you could cut from a roll of wallpaper lining paper (or even some leftover wallpaper and your crazy fold will already be decorated). It's best to cut a longer length than needed once you start to measure. If you need to get rid of the natural curl of the wallpaper or lining, simply place the roll into a sink full of warm water. It doesn't need to remain long and you will see that the paper soon flattens. Just drip the water off then lay flat on a towel until the paper is really dry and you will be all ready to begin. Margaret said that this is not a good way to flatten brown paper from the roll however.


Margaret sent this piece "to give you encouragement 

if you are whiling away your days with creative stuff.
I find it's a wonderful way to spend time, and the things
we make give pleasure to the people we share them with."


Sunday, May 10, 2020

MAY CREATIVITY

Since we, and most of the world, are staying home in hope of flattening the curve of coronavirus cases, this blog will strive to offer suggestions and projects from some of our members. We will try to update the blog every two weeks, so be sure to check in for new ideas as well as information about when regular NORBAG workshops will resume. Remember to scroll down for previous projects sent by our members.

 A former member of NORBAG emailed with a request about sending some cheer to long-term care residents experiencing isolation. She wrote that "in this time of uncertainty, we need human connection more than ever! But many of our older adults are experiencing isolation on a deep level. In order to protect residents and staff from exposure to coronavirus (COVID-19), long-term care facilities have temporarily stopped welcoming visitors. This means that residents are not able to see their families and friends...and since many of them do not use social media or teleconferencing apps, they have little or no connection to the outside world. They could really use support!" She asked if our members would pledge to send 10 cards to long-term care residents who need encouragement. "Whether it is a postcard with a pep talk, a construction paper creation, all contributions would be welcome!" A separate email has been sent to local NORBAG members with information on how to join this cause, but we're sure this kind of support would be welcome in any community. This is a great opportunity to share your artistic creations with people who are truly isolated. Many of our members are already making cards using their own paste, marbled, or eco-dyed papers so please consider sharing some of these beautiful creations with others in need of support.

Now to share some photos of what our members have been doing...


Watercolor leaf print cards by Michele K.

Biophilia by Michele K
(EO Wilson coined this term for basically the human love of nature)

Biophilia sewn over straps


Random by Michele K


Artist Trading Cards by Edge G

This is the back of the ATC cards...mixed media collage
 inspired by a You Tube video by Lorrie Marie Jenkins

Eco-dyeing by Randi P.
These latest prints were made using techniques from
Jane Dunnewold's book, Best of Both Worlds: Enhanced Botanical Printing


This print has sting added

Grace B. made collages using cut-outs from copies of the rock print and collage work
done by Dolores G and Lynne G shown in the previous blog article. Grace is 90 years

young and a charter member (25 years) of NORBAG! 

Another of Grace's new collage prints

Collage by Grace B

Bonnie J is taking Helen Hiebert's online course Flexible Book Structures 2.
The book on the left is a book light and the other two are expandable file folders.

Book Light opened and illuminated

One of the expandable file folders...the green cards lift out

Bonnie's pocket folder book. It has six slots on the left,
 plus two large slots underneath.
A slim book is just visible coming from one of those pockets.

Front of the pocket book. It closes with velcro dots,
 the brad is just for decoration.

Back side of the book has an envelope pocket
 that has been sewn with a sewing machine.