North Redwoods Book Arts Guild

If you are interested in more info or joining, please email to no.redwoods.bag@gmail.com

Showing posts with label Hedi Kyle. Show all posts

Monday, August 19, 2019

BOOK ART AT THE LIBRARY

The kiosk inside the Humboldt County Library in Eureka is once again displaying a wonderful show of book art by NORBAG members. Hedi Kyle is one of the most recognized book artists in the world. She is noted for introducing dozens of different book bindings and folds, many of which are described in her book, The Art of the Fold. Collaborating with her daughter, Ulla Warchol, they have produced one of the best "how to" books for book artists. This book is available for check-out at the library.

The current kiosk display features books made in the style of Hedi Kyle. One Panorama Book features the art of local murals, and another has two-sided Asian art. One of the Piano Hinge books was taught by Lara Cox at our March workshop and is made with hand marbled paper, Mylar windows, and decorative fibers. Also on display are examples of Sling Fold and Star Box books that are challenging to make, but fun to operate; colorful Record Pocket Books; Flag Books and Interlocking Loops; a Fish Fold on thirty inch paper; and Tree Folds on hand painted paper and Tyvek. One special book titled “Around the World with Itsy Bitsy Spider” features the familiar song in many languages on the pages of a Spider Book. If you're in the Eureka area, be sure to check out this great display.


Thank you Dianne Byington for this creative display.

Thursday, May 2, 2019

FISHBONE AND TREE FOLDS

Hedi Kyle's book, The Art of the Fold, (available in the NORBAG Lending Library) provides a wealth of information and examples of some wonderful book structures. The May NORBAG workshop will feature two of those folds, the fishbone and the tree. Dianne Byington will instruct us on the difference between them and how to make them along with some variations. Some basic skills to be covered are paper folding, mountain fold, valley fold, and because of the many folds, we will review how to determine grain direction of papers to prevent cracked folds.


Tree fold, with varying page lengths

Tools and Materials to Bring:
  • Self-healing cutting mat
  • Scissors
  • Craft knife or X-acto knife
  • Bone folder
  • Pencil & eraser
  • Scoring tool - paper will be scored multiple times so bring your favorite scoring tool: clear gridded ruler, measuring rules, ruler, or scoring board
  • Embossing stylus or pointed bone folder
  • Double-sided tape, 1/4" wide suggested

Materials Provided:

  • Paper, decorative on one side, white on the other 


Fishbone fold, with sharp folds

Fishbone fold, with soft folds

WHEN:    Saturday, May 11 at noon
WHERE:  Eureka Methodist Church at Del Norte and F Streets
BRING?   See list above
COST:     50 cents
RSVP:     YES! by Wednesday May 8 to Dianne Byington, contact information will be in the newsletter.


Friday, March 15, 2019

Hedi Kyle - Piano Hinge Workshop


The March 2019 meeting was very busy. Hedi Kyle structures were the theme. We had a total of 22 exchange books. Our “Show and Tell” table was full too. And the workshop had about 21 of us. Lots of things to see and do.

Workshop

Lara Cox taught us the Hedi Kyle structure from The Art of the Fold found on pgs. 144-147. The structure is a marriage of the simple accordion fold and a piano hinge. The pages are made from a double length folded in half with the folded edge at the fore edge. Then we cut a window through the entire page and put a mylar pocket between the folded page and filled it with things of choice. Those windows can be viewed separately, but also as a marriage of images because they are all see through.

This was an unusual workshop. It sounds like it should be easy and quick. Fold an accordion, make a few cuts on the accordion spine, fold the pages over, cut out windows, fold mylar, put “stuff” inside the mylar. Done and done quickly. That did not happen on Saturday. Lara led us through all the steps easily. There were a few questions about where to cut the accordion that were immediately resolved. But things slowed down with the “put stuff into the mylar pockets.” Also, the marriage of structure and content was delightful. Our members, recognizing that you would see the contents of a single page and all pages at the same time, recognized the need for thought and creativity. We don’t have a lot of finished books because people wanted to spend time working on content at home. The members will bring their finished books to the next meeting.
Lara brought several examples of this structure.

The square cut from the cover is much smaller than the interior windows.
 It gives a taste of what is to come.


When opening the book, you see all of the inclusions at once
 or simply concentrate on the topmost page.
 (Note: sorry for the reflections.)


This sample shows how the contours of the book can be changed.  


This is the interior of the above book. Lara has an unusual paper being used in the windows. She explained that she was doing suminagashi and between prints, she used a torn strip of paper to remove the unused ink. She saved them and they are the contents of these mylar pockets.


WORKSHOP PHOTOS


After making a 16 panel accordion fold, we clipped the ends together
 to make sure that the horizontal cuts in the spine were identical.


The vertical cuts were different from end to end so the piano hinge worked.


We added a bit of tape on the inner edge of the cutouts so that the opening
 would hold the "hotdog on a stick" piece of wood stay in place.


Checking for fit of the stick.


When we put the ends together and slid in the stick,
 the marriage of the two structures was easily seen.
  The pages will be affixed to the accordion.


Spine finished, we folded the double length pages in half and using the orange jig, cut a hole in each folded page. In this picture, the folded edge of the light blue/lavender page is on the left.


Next was the mylar. Some of us used gloves
 to make sure we didn't leave any fingerprints on the mylar.


As usual, each member brought their own creativity to their pages. 
This member is using a background photo with geometric shapes floating above.


Feathers? Yes. 


Next comes someone with photograph cutouts and lacy sheets.


This member brought some mylar that had been used as a pastepaper base. Interesting? Yes!


Threads. On several layers of pages.


Just scraps (as shown in Hedi Kyle's book).


Circus signs.


Looking through the pages. 


Show and Tell Table

The Show and Tell table this month included more examples of the workshop
 structure as well as works in process, experimentation and awesome books. 


This was the March project page.


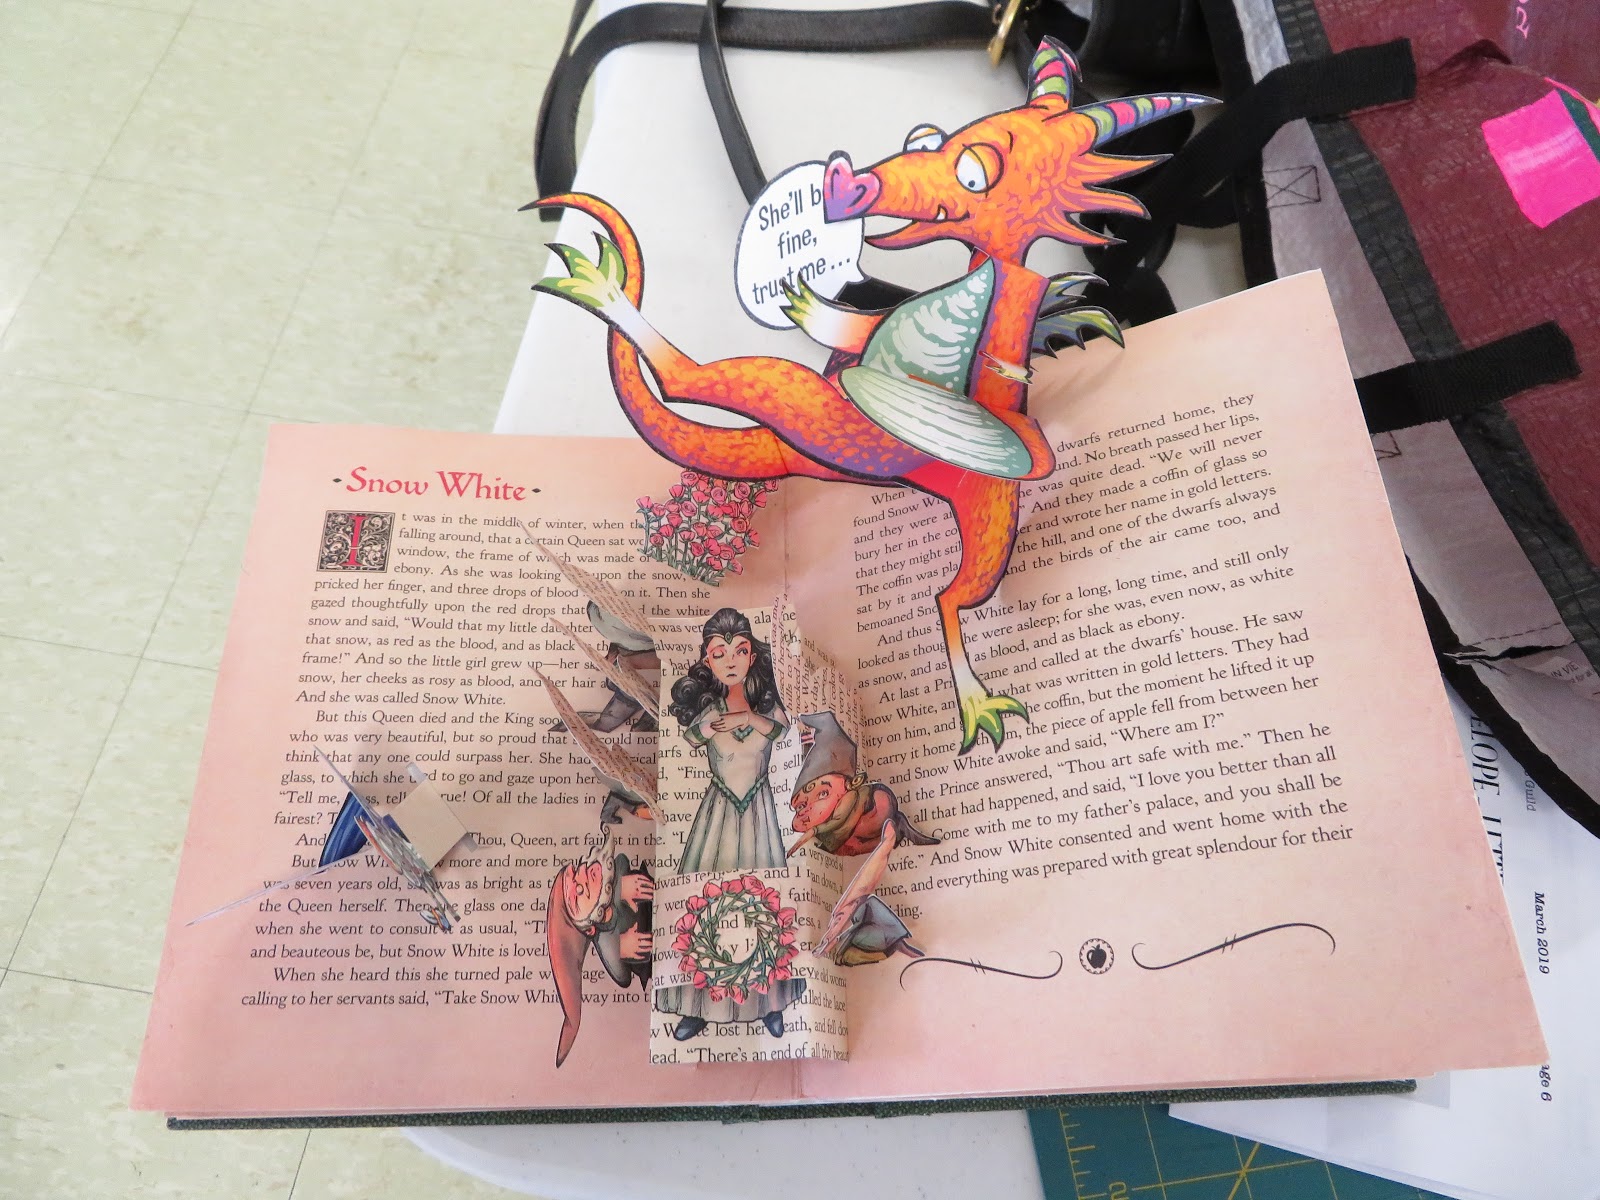
This is a pop-up book that actually used the book pages for the pop-ups.


As usual, we laughed, we worked, we had fun!


 If you have made it this far, go back to the top of the blog and click on Flickr gallery. The exchange pictures are up!


Wednesday, January 23, 2019

THE SPIDER BOOK WORKSHOP


 On Saturday, January 12, 2019 we had a delightful workshop given by Dianne Byington. She presented a Hedi Kyle structure from the book, The Art of the Fold. It is a "spider" book. The name is from the fact that when the structure is standing on the fore edge, it looks suspiciously like a spider with the triangular spine as a head and the folded pages looking like segmented legs. Dianne had a sample made in black that had two of the tiniest black, shiny beads attached to the outer portion of the spine looking just like a spider.


Just love this sweet little "spider"
Lynne G, our newsletter editor, saw the pictures and brought another sample that was filled with spiders. Needless to say, we were really ready to play with the Hedi Kyle structure.

The book is sewn together with a pamphlet stitch and Lynne attached a spider to the thread.
 Don't get the wrong idea. This was not a Halloween workshop! Dianne gave us a very clear idea of what this could look like and it was not dark and dreary. Instead, the structure calls for color. Just look at the other samples that Dianne brought.


Take a close look at these books (click on the picture and it gets bigger). Dianne's samples also have different types of fore edge closures. From a simple cut edge, a folded edge and even (the grey one) a box-like closure.
Dianne started the day.

We started with a rectangle of paper, folded it in half and each of those in half again. This is the core of the spine. We will eventually have the two ends overlapping and glued together after the pages have been sewn onto it.

Applying tape to the edge that will overlap

We folded all of the interior pages in half


Once all of the pages are folded in the center, on successive pages, a second fold will be made to the left and right of the center fold at increasing distances. 


Each successive page has a deeper fold. The spine will eventually nestle into the deepest V.
Because of the multiple folds on each page, the usual punching cradle doesn't work as well as a simple telephone book. With the smallest fold on the bottom and ending with the opened spine (the order you use to sew the pamphlet stitch), we used a jig to make the stitching holes.

We sew the pamphlet stitch from inside of the spine to the center of the pages. When that is complete, the double-sided tape is exposed on the spine and the two flaps are put together.  Then on to the covers.


Last, but not least is the addition of a cover. The cover comes in two parts. Each part has a section that is the width of the spine base. The back cover is applied first so that the smaller folded portion covers the spine. Then you apply the front cover with the flap covering the back flap.

Dianne gave us several techniques about doing things with these books. She also suggested three different fore edge closures. The most simple cut it off, a folded back edge to give more strength and this one where the fore edge is folded the width of the spine. You can see it in the closed position in the first pictures. Many thanks to Dianne.

ON TO THE FINISHED BOOKS!