 |
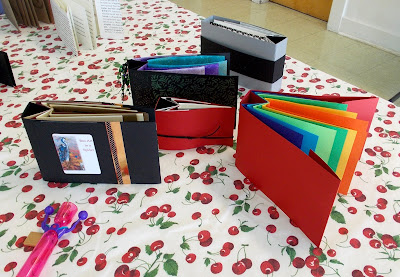
| Just love this sweet little "spider" |
 |
| The book is sewn together with a pamphlet stitch and Lynne attached a spider to the thread. |
 |
| Dianne started the day. |
 |
| We started with a rectangle of paper, folded it in half and each of those in half again. This is the core of the spine. We will eventually have the two ends overlapping and glued together after the pages have been sewn onto it. |
 |
| Applying tape to the edge that will overlap |
 |
| We folded all of the interior pages in half |
 |
| Once all of the pages are folded in the center, on successive pages, a second fold will be made to the left and right of the center fold at increasing distances. |
 |
| Each successive page has a deeper fold. The spine will eventually nestle into the deepest V. |
 |
| Because of the multiple folds on each page, the usual punching cradle doesn't work as well as a simple telephone book. With the smallest fold on the bottom and ending with the opened spine (the order you use to sew the pamphlet stitch), we used a jig to make the stitching holes. |
 |
| We sew the pamphlet stitch from inside of the spine to the center of the pages. When that is complete, the double-sided tape is exposed on the spine and the two flaps are put together. Then on to the covers. |
 |
| Last, but not least is the addition of a cover. The cover comes in two parts. Each part has a section that is the width of the spine base. The back cover is applied first so that the smaller folded portion covers the spine. Then you apply the front cover with the flap covering the back flap. |
 |
| Dianne gave us several techniques about doing things with these books. She also suggested three different fore edge closures. The most simple cut it off, a folded back edge to give more strength and this one where the fore edge is folded the width of the spine. You can see it in the closed position in the first pictures. Many thanks to Dianne. |


No comments:
Post a Comment